Depth of field in p5.js
I find a lot of generative art has a flattened, graphic design-inspired style. There are cultural reasons for this (generative art using code has its roots in conceptual art and minimalism) and technical reasons (there is a significantly higher learning curve and barrier to entry when programming for photorealism.) Lots of amazing work is made in this style! That said, a great way to inspire new ideas is to try to do the opposite of what you are used to doing. For that reason, I wanted to try to take a step towards something a bit more cinematic and add some depth of field blur to my 3D scenes.
If we're going to program this effect, we should start off with an understanding of what exactly it is we're making. The term "depth of field" is a term from cameras, and it refers to how much wiggle room you have when positioning an object when you want it to appear sharp in a photo. Position it too close or too far from the camera and it will start to blur and go out of focus. So why does that happen?
Two sentences about the actual optics and then we'll move on I swear
The lens of a camera bends light to try to focus it onto the film in the camera. When all the light that originated from a single point on an object ends up focused to a single point on the film, then that point appears sharp in the image; otherwise, the light from that point gets spread out and the result is a blurry image.
Why does that make an image look fuzzy though?
Why does an image look fuzzy when the light gets spread out? It's one of those things that feels intuitive, but maybe that's just because we're so used to seeing it.
To simulate the effect of a bunch of photons spreading out, let's see what happens when we duplicate an image a bunch of times, all slightly transparent. Drag the sliders to see how it looks with more or less copies of an image (the more copies, the closer we get to "real life" with billions of photons) and to see how it looks when spread out various amounts.
Basically: with enough samples, all with random offsets, we converge on a smooth blur! This will be a guiding principle for how we implement our own blur.
A simple model for how focal blur works
So, we know how to uniformly blur a whole image. A photo isn't all blurred uniformly, though; some things in the image are in focus and others aren't. Instead, we need to treat every fragment of every object in the image as a separate object, and blur them different amounts. Every fragment that we render will be blurred, and the question is just how much.
The camera has a target focal distance. If we are rendering a fragment that is exactly that distance away, its colour will be spread out over a radius of zero and it will be perfectly in focus.
The camera also has a blur rate. As a fragment's distance from the focal target increases, its blur radius increases by the blur rate.
Let's make an algorithm!
Imagine our image is an array of pixels, where each one has a color, a position on the screen, and also a depth.
type Pixel = {
  // Position in the screen
  x: number
  y: number

  // 3D depth of the object that this pixel came from
  depth: number

  // The color of the pixel
  r: number
  g: number
  b: number
}
Then, to produce a blurred image, we can just calculate the blur radius of each pixel and draw it blurred it by that amount. We also need to draw the farthest pixels first so that their blurs don't accidentally overlap with pixels that are closer to the camera.
function drawBlurred(
  pixels: Pixel[],
  targetDistance: number,
  blurRate: number
) {
  // Draw farther pixels first by sorting by depth, descending
  pixels.sort((a, b) => b.depth - a.depth)

  noStroke()
  for (cont pixel of pixels) {
    fill(pixel.r, pixel.g, pixel.b)
    const blurRadius = abs(pixel.depth - targetDistance) * blurRate
    drawingContext.filter = `blur(${blurRadius}px)`
    rect(pixel.x, pixel.y, 1, 1)
  }
}
This would work, but blurring one pixel at a time like this is slow, and we don't automatically know the depth of each pixel.
We could render one object at a time with this method instead of one pixel at a time, and that works decently. In fact, that's what I used for this sketch, playing off of the album art for Muse's Origin of Symmetry:
However, this uniformly blurs each object, so it can't handle single objects being partially in focus and partially out of focus. It would be great if we could get true per-pixel blur.
WebGL to the rescue!
If we're rendering a 3D scene via WebGL, it actually does have the depth information stored! It isn't immediately accessible to us, but it's used internally in the rendering pipeline.
If you were drawing a scene in a 2D canvas, you manage depth by drawing the farthest objects first. This way, closer objects have the ability to draw overtop of the previously drawn farther objects. This is called the painter's algorithm and we just did this earlier when we sorted pixels by their depth.
WebGL works a little differently, however. You can draw things in any order you want and it will still still show closer objects in front (well, unless you tell it not to.) It does this by recording the depth of every pixel in a depth buffer, which is like a monochrome image the same size as the main canvas. Instead of interpreting the pixel values in the depth buffer as colours, you read them as depth.

The brightness of the depth buffer linearly maps to the distance from the camera, where full white and full black are determined by the far and near planes in the perspective matrix.
When drawing a new object in WebGL, for each pixel on the screen that an object occupies, WebGL checks in the depth buffer to see whether the last thing drawn on that pixel is closer to the camera than the current object. If so, it will not update the colour of that pixel, since the object being drawn should be occluded by the already drawn pixel. Otherwise, WebGL will update the pixel colour and store a new depth value in the depth buffer.
Reading the depth buffer
Usually, the depth buffer is just something internal. Thankfully, WebGL gives us a way to draw to a texture instead of directly to the canvas. If we draw to a texture first, then we can read that texture from a shader later on as if it were just a regular image!
In WebGL, a render target is called a framebuffer. We can create a new one like so:
const colorTexture = gl.createTexture()
gl.bindTexture(gl.TEXTURE_2D, colorTexture)
gl.texImage2D(gl.TEXTURE_2D, 0, gl.RGBA, width, height, 0, gl.RGBA, gl.UNSIGNED_BYTE, null)

const depthTexture = gl.createTexture()
gl.bindTexture(gl.TEXTURE_2D, depthTexture)
gl.texImage2D(gl.TEXTURE_2D, 0, gl.DEPTH_COMPONENT, width, height, 0, gl.DEPTH_COMPONENT, gl.UNSIGNED_SHORT, null)

const framebuffer = gl.createFramebuffer()
gl.bindFramebuffer(gl.FRAMEBUFFER, framebuffer)
gl.framebufferTexture2D(gl.FRAMEBUFFER, gl.COLOR_ATTACHMENT0, gl.TEXTURE_2D, colorTexture, 0)
gl.framebufferTexture2D(gl.FRAMEBUFFER, gl.DEPTH_ATTACHMENT, gl.TEXTURE_2D, depthTexture, 0)
Now, if we want to render to our textures, we just bind the framebuffer we made before drawing:
gl.bindFramebuffer(gl.FRAMEBUFFER, framebuffer)
And then if we want to draw to the main canvas, we bind null, which sets the render target back to the default canvas:
gl.bindFramebuffer(gl.FRAMEBUFFER, null)
We can pass the depth (or, similarly, colour) textures into a shader now:
gl.activeTexture(gl.TEXTURE0)
gl.bindTexture(gl.TEXTURE_2D, depthTexture)
The blur algorithm, in a shader this time
So, in a shader we have access to the depth values now! But the other limitation of a shader is that we are writing a program that computes the colour of just one pixel at a time. In our previous algorithm, we mapped each pixel on the original image to possibly multiple pixels on the blurred image. Now, we need to write a program that does the reverse: it must take as input a pixel location in the blurred image, and then fetch possibly many pixel colours from the original image in order to produce a final colour.
Our strategy is going to be to look at as many nearby pixels as we can, and detect whether (1) we are close enough to it that its blur would touch the current pixel, and (2) whether that blur would go in front or behind of the current pixel.
We need to sample nearby pixels, see how far its blur reaches, and see if that brings it in front or behind of us.
Our algorithm for each pixel will now look like this:
- Find the z value at the target pixel
- Calculate the target pixel's blur radius given that z
- Sample nearby pixels within the maximum blur radius
- For each nearby pixel:
- Get the sample's z value
- Get the sample's blur radius from its z
- To blur this pixel's colour with nearby colours that are behind it: if the sample is farther back than the target pixel add the sample's colour to the mix if it's within the target pixel's blur radius
- To make sure blur from nearby pixels in front of us are still visible on top: if the sample is closer than the target pixel, add the sample's colour to the mix if it's within the sample pixel's blur radius
For efficiency reasons, we might want to avoid looping over every nearby pixel, so we can randomly sample nearby pixels. To get the smoothest output from our limited samples, we can non-uniformly sample nearby pixels so that we get more samples in the areas that will reduce noise the most.
Now how do we shoehorn that into the p5 pipeline?
Normally, p5 manages its own WebGL textures. This would get hairy if you have to manage it on your own, so this is one of the best features of p5!
WebGL is kind of like a communication protocol between your CPU and your GPU. The CPU is where your javascript lives and runs, and the GPU is responsible for rendering the content of your canvas element. There are things on the CPU that you will want to send to the GPU in order to render your canvas. You might have images and other canvases that you would like to composite together in your render, so those need to get sent from the CPU to the GPU.
Because of this, p5 makes the assumption that every texture you use on the GPU comes from a data source on the CPU. Every image you use in your WebGL sketch is given an accompanying WebGL texture by p5 (wrapped up nicely in the p5.Texture class), and p5 sends new image data from the CPU to the GPU to put into that texture every time the image updates.
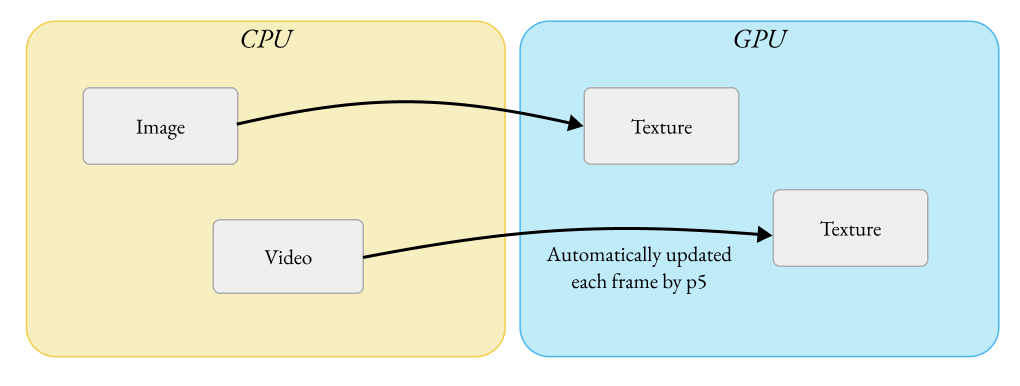
p5 assumes every WebGL texture comes from some data source on the CPU.
(Aside: when you draw a p5.Graphics to a WebGL canvas, it sends data every frame: p5 isn't able to detect when a canvas changes, so it has to play it safe and update the canvas every frame just in case something has. This can be a performance bottleneck. If you have canvases that don't change, consider using const img = yourGraphic.get() to create a static p5.Image from your graphic, so p5 won't need to keep re-sending the same data to the GPU every frame.)
The trouble with our framebuffer textures is that they don't have content on the CPU with them! They get content when you render to them via WebGL, which is already on the GPU. If we want to call myShader.setUniform() and pass in a framebuffer texture as if it's any other image, we need to patch support for this into p5.
I've chosen to do this by creating a subclass of p5.Texture that replaces p5's default behaviour of updating WebGL texture data from the CPU with a function that does nothing:
class RawTextureWrapper extends p5.Texture {
  // Override the default update behaviour and do nothing
  update() {
    return false
  }

  // Other setup omitted for brevity
}
Then, we manually pair an instance of this class with our framebuffer textures so that p5 will use our patched version instead of an upatched p5.Texture instance:
const depthP5Texture = new RawTextureWrapper(_renderer, depthTexture)
_renderer.textures.push(depthP5Texture)
Now we can render to our framebuffer, then pass the depth texture into a normal p5.Shader as a texture!
gl.bindFramebuffer(gl.FRAMEBUFFER, framebuffer)
// Draw our 3D scene to the framebuffer here
gl.bindFramebuffer(gl.FRAMEBUFFER, null)

shader(myShader)
myShader.setUniform('depth', depthTexture)
rect(0, 0, width, height)
Results
Here's an animation of an infinitely descending ladder, with some focal blur applied using this shader.
I'm pretty happy with how this one turned out! Created for the theme of "the void" for @sableRaph's weekly created coding challenge, I wanted to create something reminiscent of the experience of playing games like Amnesia. I think the blurry vision helped sell the effect.
You can inspect the source code and view it live in the p5 editor.
Future work
Now that it's working for blur, there's more I want to do with this p5 framebuffer implementation!
- Ambient occlusion: you can also approximate shadows due to indirect lighting if you have access to a depth buffer! These sorts of shadows are another great way of grounding objects in a scene and making it feel more cohesive.
- Faster multi-pass rendering: often I use multiple p5.Graphics canvases in p5 to be able to draw to multiple "layers" separately and then composite them together at the end. Sometimes the performance bottleneck is the time spent sending the canvas data from the CPU to the GPU. If I'm using WebGL canvases anyway, I could replace the multiple p5.Graphics canvases with multiple framebuffers on the same canvas, eliminating the need to send anything back-and-forth between CPU and GPU. Eventually I might turn the Framebuffer class I have in the ladder descent sketch into a proper general-purpose p5 framebuffer library.
Stay tuned for those!