Video editing with p5.js
I recently finished an animation called Your Body Is A Machine:
This one is notable for me because all the visuals are p5.js sketches! But it's not that I made them all separately, screen recorded them, and then edited them together separetely. That's more or less what I did in You Probably Can't Draw A Horse Without Reference, which also includes a few p5.js scenes, such as around 2:21 where there's a physics simulation. No: that would have been to difficult here, where the sketches are synchronized to specific parts of the music, and also where there was not as clear of a deliverable per scene, and I needed to work more experimentally and iteratively.
I mostly write about open source work for p5.js here, but in terms of hours I spend per day, the majority go to my day job at Butter, a modular video editor. The idea there is that all the components you can use are code, so it's incredibly extensible, and no asset is ever fully "dead" or locked in, as the code can easily expose controls for you. It's still very related to p5.js: right now, those programmable blocks are all written as p5.js sketches! Mostly we've been using that to easily create new customizable blocks for users of Butter, but for a while, it's been clear to me that p5.js artists could be using this to create something new. There have been a lot of great tools popping up using creative code as a performance medium, but I see Butter doing something similar for more planned productions that need nonlinear editing.
So I finally got the opportunity to make something like that recently thanks to Butter doing a bigger push for features for coders, the addition of keyframing of sketch inputs, us needing to test slightly longer projects, and just having a compatible video idea. So here we are, testing this all out with some mild health/body horror!
I wanted to break down the process a bit, in case anyone else sees something in here that they'd like to try themselves!
Structuring a project
Butter should look familiar to anyone who's used any other video editor: there's a timeline, with pills on it representing each thing in the project. You can add new things from some menus on the left. The first menu item is the Build tab, which lets you add a new code component. This pops open a code editor!
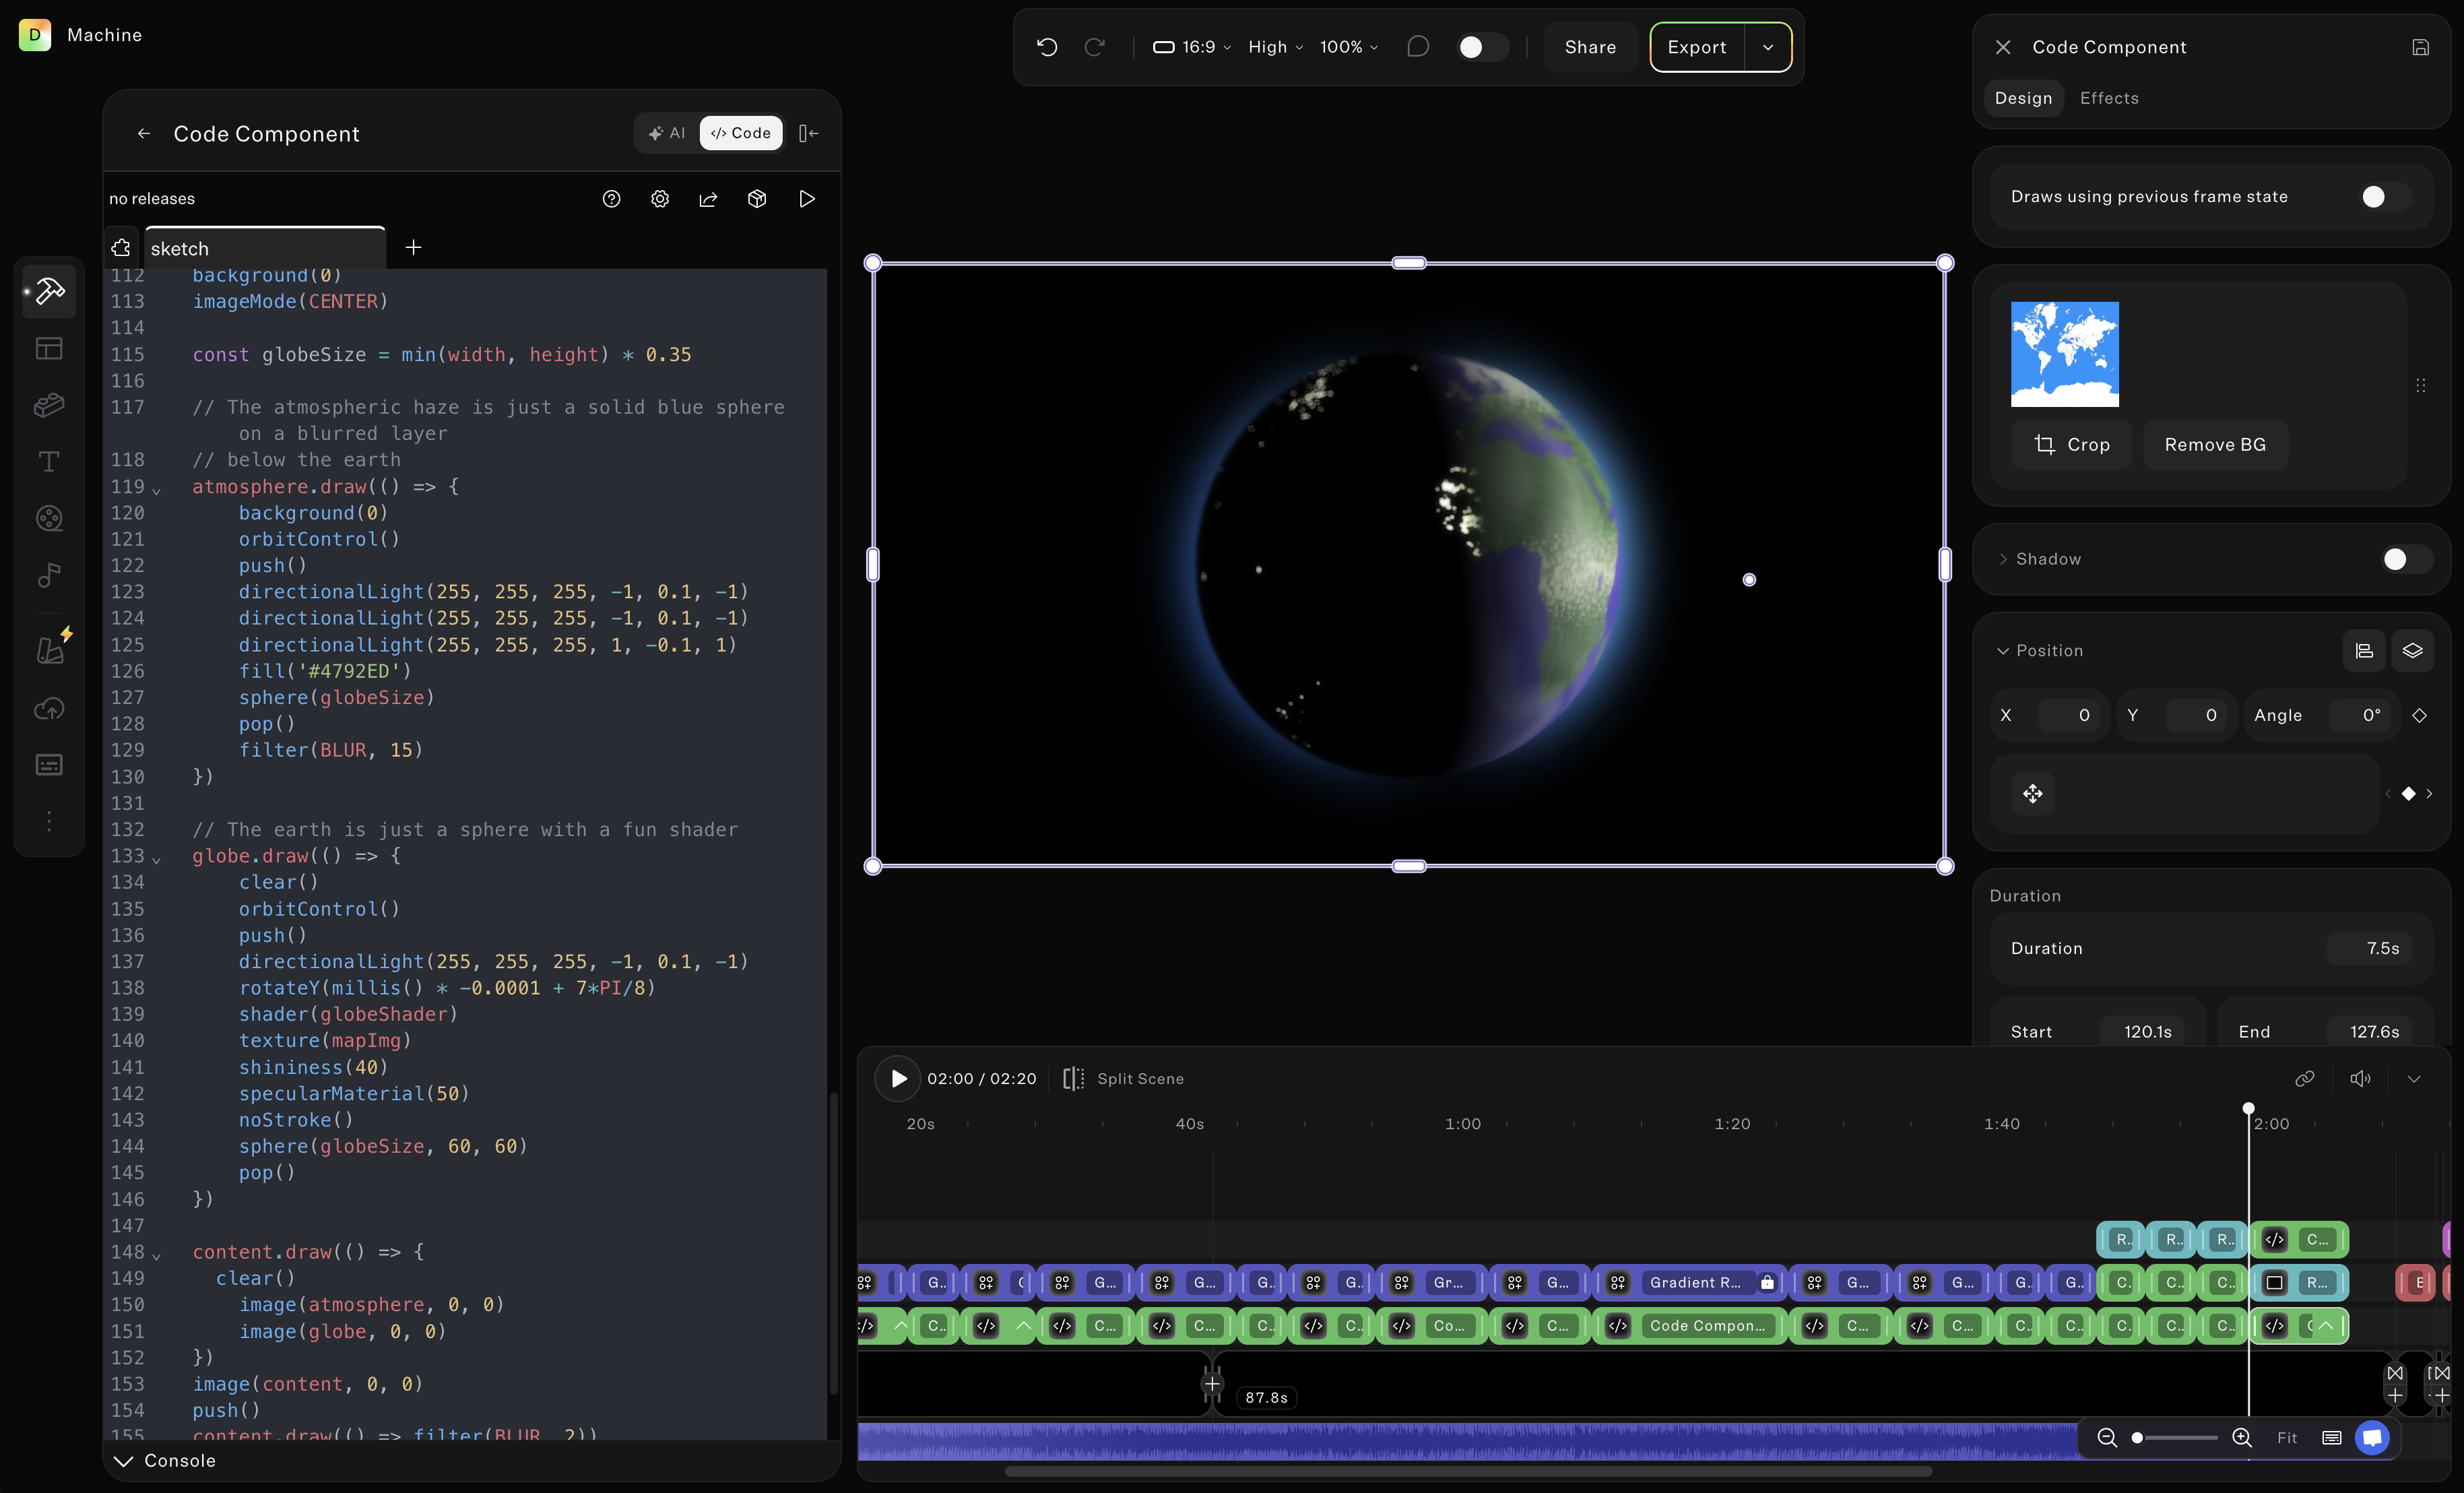
The Butter timeline and code IDE
So each thing in the timeline for my project is an editable p5.js sketch. If you createCanvas(windowWidth, windowHeight), then Butter will let you resize it on canvas freely. (Fixed-size canvases can still be scaled uniformly.)
You can also stack multiple sketches! If each sketch draws an object, you can position the different objects into a scene. But you can also stack full-screen sketches as filters. In this project, most of my sketches are black and white, and then I reuse a sketch that goes on top of all of those that applies a slight blur and applies a gradient map to recolor the content.
The code for the above is a pretty simple p5.strands shader:
let remap

let blur
let c1, c2, c3, c4

async function setup() {
  createCanvas(windowWidth, windowHeight, WEBGL);

  blur = createSlider(0, 40, 10, 0.1)
  c1 = createColorPicker('#000')
  c2 = createColorPicker('#B11')
  c3 = createColorPicker('#FB1')
  c4 = createColorPicker('#fff')

  remap = buildFilterShader(() => {
    let c1v = uniformVec4(color(c1.value()))
    let c2v = uniformVec4(color(c2.value()))
    let c3v = uniformVec4(color(c3.value()))
    let c4v = uniformVec4(color(c4.value()))
    filterColor.begin()
    let lum = (rgb) => dot(rgb, [0.2126, 0.7152, 0.0722])
    let v = getTexture(filterColor.canvasContent, filterColor.texCoord)
    let progress = lum(v.rgb)
    let out = c1v
    if (progress < 0.333) {
      out = mix(c1v, c2v, map(progress, 0, 0.333, 0, 1))
    } else if (progress < 0.666) {
      out = mix(c2v, c3v, map(progress, 0.333, 0.666, 0, 1))
    } else {
      out = mix(c3v, c4v, map(progress, 0.666, 1, 0, 1, true))
    }
    filterColor.set(out)
    filterColor.end()
  })
}

function draw() {
  clear()
  drawParentToCanvas()
  filter(BLUR, blur.value())
  filter(remap)
}
The way that it can apply this filter to the contents of another sketch rather than completely drawing its visuals from scratch is through the use of the Butter-specific function drawParentToCanvas(), which draws everything below the sketch on the timeline onto the sketch's canvas where it can be processed further.
Note also that regular p5.js sliders and inputs get turned into editable fields when you select the sketch! You can also add keyframes to most fields if you want a slider value to change over time. If you use orbitControl(), that's keyframeable too, and I used that a bit to animate camera movements in a few scenes.
If your sketch draws fully from scratch every frame based only on time variables like frameCount or millis(), you can seek anywhere instantly. But even for sketches that update incrementally from frame to frame, such as a physics simulation, you can still scrub back through time, and it will load for a moment and then show you the right frame.
Scene breakdowns
That's what you can do in Butter generally, but now let's look at a few scenes, which are still just standalone p5.js sketches.
Folds
This one is a single filter shader, using some domain warping on noise to produce the folds. A bulge is applied by pushing the coordinates out away from the location of the circle int he center. The bands come from fract(abs(coord.x) / 50), taking a number that goes from 0 up to a few hundred, and then making it go from 0-1 and repeat again every approximately 50 pixels (approximately, because this is a warped coordinate.)
let bulge
async function setup() {
  createCanvas(windowWidth, windowHeight, WEBGL);
  bulge = buildFilterShader(() => {
    filterColor.begin()
    noiseDetail(4, 0.5)
    let coord = (filterColor.texCoord - 0.5) * filterColor.canvasSize * 2

    let origCoord = coord
    let tOff = [0, frameCount * 2.5]
    coord = coord + tOff
    let s = 0.001
    coord = coord + ([
      noise(coord.x*s, coord.y*s, 0),
      noise(coord.x*s, coord.y*s, PI)
    ] - 0.5) * 200

    let pos = 5 * [sin(frameCount * 0.05), sin(frameCount*0.07)]
    let toPos = pos - origCoord
    let len = length(toPos)
    coord = mix(coord, pos, 1-smoothstep(0, 180, len))

    let outColor = 0.5 * (1 + sin(coord.x))
    if (len < 45) {
      outColor = 0.9
    } else if (abs(coord.x) < 20) {
      outColor = 0
    } else {
      outColor = mix(fract(abs(coord.x) / 50), 0, 0.5)
    }
    filterColor.set([outColor, outColor, outColor, 1])
    filterColor.end()
  })
}
function draw() {
  clear()
  filter(bulge)
}
Bellows
I particularly liked how this one turned out. It uses a material shader to (1) wrinkle and (2) inflate some spheres.
The wrinkling is just using some noise to offset the vertices of the sphere. However, you can't just move the vertex positions: you also need to update the normals in order for the lighting to be correct. I made a library for this in the past for something more robust, but if you can come up with two direction vectors u and v that are perpendicular to a surface, and you have a function warp(pt) that you're using to adjust the positions of a point, then you can pick a small value h and approximate the new normal as:
normal = normalize(cross(
  (warp(pt + h*u) - warp(pt)) / h,
  (warp(pt + h*v) - warp(pt)) / h
))
Then to do the inflation, I just apply less noise the more inflated the sphere is, making it closer to a perfect sphere, and I also extend the sphere out along its normal.
let pulse
async function setup() {
  createCanvas(windowWidth, windowHeight, WEBGL);
  pulse = buildMaterialShader(() => {
    worldInputs.begin()
    noiseDetail(4, 0.5)
    let s = 0.005
    let pulseAmount = uniformFloat()
    let amt = mix(0, 50, 1 - pulseAmount)
    let extrude = mix(0, 30, pulseAmount)
    let warp = (pt) => {
      return pt + ([
        noise(pt*s + 123.456),
        noise(pt*s + 456.123),
        noise(pt*s + 264.891)
      ] - 0.5) * amt
    }

    let d = 1
    let up = abs(worldInputs.normal.y) > 0.9 ? [1, 0, 0] : [0, 1, 0]
    let u = normalize(cross(worldInputs.normal, up))
    let v = cross(worldInputs.normal, u)
    const wc = warp(worldInputs.position)
    const wu = warp(worldInputs.position + u * d)
    const wv = warp(worldInputs.position + v * d)
    worldInputs.position = wc

    let n = normalize(cross((wu-wc)/d, (wv-wc)/d))
    worldInputs.normal = n
    worldInputs.position += n * extrude
    worldInputs.end()
  })
}
function draw() {
  randomSeed(1)
  background(0)
  noStroke()
  push()
  let v = 200
  directionalLight(v, v, v, 0, 0, -1)
  directionalLight(255, 255, 255, 1, 0, 1)
  directionalLight(255, 255, 255, -1, 0, 1)
  orbitControl()
  shader(pulse)
  for (let i = 0; i < 5; i++) {
    push()
    let p = pow(
      0.5 * (
        sin(-PI/2 + frameCount * 0.03 + i*0.05) + 1
      ),
      2
    ) + 0.05*(1+sin(frameCount*0.12 + i * 0.1))
    pulse.setUniform('pulseAmount', p)
    emissiveMaterial(50 + 50 * p)
    translate(
      random(-1, 1) * width/2,
      random(-1, 1) * height/2,
      random(-2, 1.1) * width,
    )
    sphere(30, 50, 50)
    pop()
  }
  pop()
}
Skin
This is inspired by the approach of Cloth Simulator by Naoki Tsutae on OpenProcessing: you can get a cool result without doing a full spring system, and instead just have every link in a graph pull the node toward its linked partner. If we let the nodes on the edges move, everything would collapse into a single point eventually. But with pinned edges, things reach an interesting equilibrium.
Here, I have it removing links from the graph each frame that are close to a point that moves around randomly using noise(). The sudden removal of a link means suddenly the equilibrium changes. Because these aren't real springs, the links adapt somewhat slowly and smoothly, which looks cool and gooey with the blur/gradient map filter on top.
let nodes = []
let links = []
const velocityDamping = 0.8
const accelerationScale = 90
const cutRadius = 10
const maxSpeed = 960
const cellSize = 10
const loopDuration = 5 // seconds
let gridCountX, gridCountY
let seed
let elapsedTime = 0

class Node {
  constructor(x, y, isEdge) {
    this.position = createVector(x, y)
    this.velocity = createVector(0, 0)
    this.force = createVector(0, 0)
    this.isEdge = isEdge
  }

  update(dt) {
    if (this.isEdge) return

    this.velocity.add(this.force.copy().mult(accelerationScale * dt))
    this.velocity.limit(maxSpeed)
    this.position.add(this.velocity.copy().mult(dt))

    this.force.set(0, 0)
    this.velocity.mult(velocityDamping)
  }
}

class Link {
  constructor(source, target) {
    this.source = source
    this.target = target
  }

  midpoint() {
    return this.source.position.copy().add(this.target.position).mult(0.5)
  }

  update() {
    const offset = this.target.position.copy().sub(
      this.source.position
    )

    if (!this.source.isEdge) this.source.force.add(offset)
    if (!this.target.isEdge) this.target.force.sub(offset)
  }

  draw() {
    line(
      this.source.position.x,
      this.source.position.y,
      this.target.position.x,
      this.target.position.y
    )
  }
}

function setup() {
  createCanvas(200, 200)

  gridCountX = ceil(width / cellSize)
  gridCountY = ceil(height / cellSize)

  resetSimulation()
}

function resetSimulation() {
  seed = random(1000000)
  randomSeed(seed)

  nodes = createNodes()
  links = createLinks(nodes)
  elapsedTime = 0
}

function createNodes() {
  const nodes = []
  const jitter = 0.25

  for (let y = 0; y <= gridCountY; y++) {
    for (let x = 0; x <= gridCountX; x++) {
      const isEdge =
        x === 0 ||
        y === 0 ||
        x === gridCountX ||
        y === gridCountY

      nodes.push(
        new Node(
          map(x + random(-jitter, jitter), 0, gridCountX, 0, width - 1),
          map(y + random(-jitter, jitter), 0, gridCountY, 0, height - 1),
          isEdge
        )
      )
    }
  }

  return nodes
}

function createLinks(nodes) {
  const links = []
  const maxNeighborDistance = Math.hypot(cellSize, cellSize) * 1.1

  nodes.forEach((current, index) => {
    for (let i = index + 1; i < nodes.length; i++) {
      const other = nodes[i]

      if (
        current.position.dist(other.position) <= maxNeighborDistance &&
        !(current.isEdge && other.isEdge)
      ) {
        links.push(new Link(current, other))
      }
    }
  })

  return links
}

function draw() {
  const dt = min(deltaTime / 1000, 0.1)
  elapsedTime += dt
  if (elapsedTime >= loopDuration) {
    resetSimulation()
  }

  background(0)
  stroke(255)
  noFill()

  links.forEach((link) => link.update())
  nodes.forEach((node) => node.update(dt))
  links.forEach((link) => link.draw())

  const cutCenter = createVector(
    (noise(elapsedTime * 3.0, PI * 0.1, seed) - 0.1) * width * 1.2,
    (noise(elapsedTime * 21.0, PI * 2.1, seed) - 0.1) * height * 1.2
  )

  links = links.filter(
    link => link.midpoint().dist(cutCenter) > cutRadius
  )
}
Buildings
This one has two parts: a material shader for the clouds, and a material shader for the buildings. I've left the camera facing forward here so you can see how everything is set up; in the final video I rotated the camera so that you can't see that there is no ground!
The clouds are just a plane where I've used a p5.strands shader to make a cloud texture with noise. The noise is just used to mix between blue and white. I also make it fade to white at the end where I know the horizon will be.
The buildings use p5.strands instancing. A building's geometry is actually just one floor. When I draw it with multiple instances, the shader offsets each instance vertically. I just increase the number of instances over time to make them grow.
let clouds
let buildings
let seed
let buildingShader

let sceneStartTime
const sceneDuration = 5000

async function setup() {
  createCanvas(windowWidth, windowHeight, WEBGL)

  clouds = buildMaterialShader(() => {
    pixelInputs.begin()
    noiseDetail(4, 0.8)
    pixelInputs.color = mix(
      [0.5, 0.6, 1, 1],
      [1, 1, 1, 1],
      map(
        noise([
          pixelInputs.texCoord * 10 + [1, 2] * millis() * 0.0005,
          millis() * 0.0003
        ]),
        0.3,
        0.8,
        0,
        1,
        true
      )
    )
    pixelInputs.color = mix(pixelInputs.color, [1, 1, 1, 1], smoothstep(0.5, 0, pixelInputs.texCoord.y))
    pixelInputs.end()
  })

  buildingShader = buildMaterialShader(() => {
    let h = uniformFloat()
    worldInputs.begin()
    worldInputs.position.y -= h * instanceID()
    worldInputs.end()
  })

  resetScene()
}

function resetScene() {
  seed = random(1000000)
  randomSeed(seed)
  sceneStartTime = millis()

  push()
  colorMode(HSB, 1, 1, 1)

  buildings = []

  for (let i = 0; i < 60; i++) {
    const building = {}

    const h = random(50, 90)
    const w = random(100, 200)
    const d = random(100, 200)
    const numFloors = floor(random(10, 40))
    const rate = random(0.5, 5)

    const brickColor = color(random(), random(0.1), random(0.4, 0.8))
    const windowColor = color('#447')

    const windowH = random(0.5, 0.9) * h
    const numWindows = floor(random(5, 15))
    const windowW = w / numWindows * random(0.7, 0.95)

    const floorGeom = buildGeometry(() => {
      noStroke()

      fill(brickColor)
      box(w, h, d)

      fill(windowColor)
      translate(0, 0, d / 2)

      for (let j = 0; j < numWindows; j++) {
        push()
        translate(map(j + 0.5, 0, numWindows, -w / 2, w / 2), 0)
        box(windowW, windowH, 2)
        pop()
      }
    })

    const z = random(300, 8000)
    const x = random(-1, 1) * width * 3 * map(z, 0, 8000, 1, 3)
    const y = 0

    const draw = () => {
      push()

      translate(x, y, -z)

      buildingShader.setUniform('h', h)

      const elapsed = (millis() - sceneStartTime) / 1000
      model(floorGeom, min(numFloors, ceil(elapsed * rate)))

      pop()
    }

    buildings.push({ draw })
  }

  pop()
}

function draw() {
  if (millis() - sceneStartTime > sceneDuration) {
    resetScene()
  }

  background(255)
  orbitControl()
  noStroke()

  push()
  translate(0, -200, -800)

  shader(clouds)
  rotateX(PI / 2)
  plane(10000, 10000)

  pop()

  clearDepth()

  push()

  ambientLight(120, 120, 180)
  directionalLight(255, 250, 220, -1, 1, -0.5)
  directionalLight(200, 200, 200, -1, 1, -0.5)

  shader(buildingShader)

  translate(0, height / 2)

  for (const building of buildings) {
    building.draw()
  }

  pop()
}
The creative process
I've been yearning for a long time to replicate an experience like Flash where you can iterate between editing and coding in the same workspace. I'm happy to report that I've finally got a workflow that at least somewhat scratches that itch!
While certainly a lot of this could have been done the old way with more planning involved, it's quite freeing for me to be able to experiment with moving sketches around—maybe this visual would work better in this other part of the audio?—and then iterating on the visuals in that new context. It also let me quickly test out pulses in the code that match the beat of the music closely enough for the few seconds each scene is on screen that I didn't have to actually figure out the beats per minute of the music and convert that into frames.
So I'll definitely be doing more of this in the future. I also hope to eventualy capture more of the interactive parts of p5, such as mouse input, into Butter. Maybe one can record the mouse and then have it play back with the recorded values? Or maybe it should be keyframeable? Let me know if you have any thoughts on that or other things you'd like to use!