p5.strands: Writing shaders in JavaScript
In the new release of p5.js 2.0, we're adding a pretty big new feature: you can now write shaders in JavaScript! It's called p5.strands. Let's talk a bit into how it works!

p5.strands, animated via p5.strands
Shader programming is an area of creative coding that can feel like a dark art to many. People share lots of stunning visuals that are created with shaders, but shaders feel like a completely different way of coding, requiring you to learn a new language, pipeline, and paradigm.
p5.strands hopes to address all of those issues!
Firstly, a common misconception is that making shader art is an all-or-nothing choice: either you make art the normal way, or you spend your time in shader land. It doesn't have to be that drastic of a shift! Actually, no matter what you do in p5's WebGL mode, you're using shaders: we have some simple shaders to position shapes on the screen, and vertices to apply the colors and lighting that you use. So shaders are also used when drawing run-of-the-mill shapes in p5.
p5.strands lets you tap into what p5's shaders are already doing. Are you drawing shapes, but want to do some custom per-pixel coloring? There's a strand you can tap into for that:
myShader = baseMaterialShader().modify(() => {
  getPixelInputs((inputs) => {
    let stripe = smoothstep(
      -0.01,
      0.01,
      sin(sin(inputs.texCoord.x * 12 * PI) * 4 + inputs.texCoord.y * 10)
    );
    inputs.color.xyz = stripe;
    return inputs;
  })
})
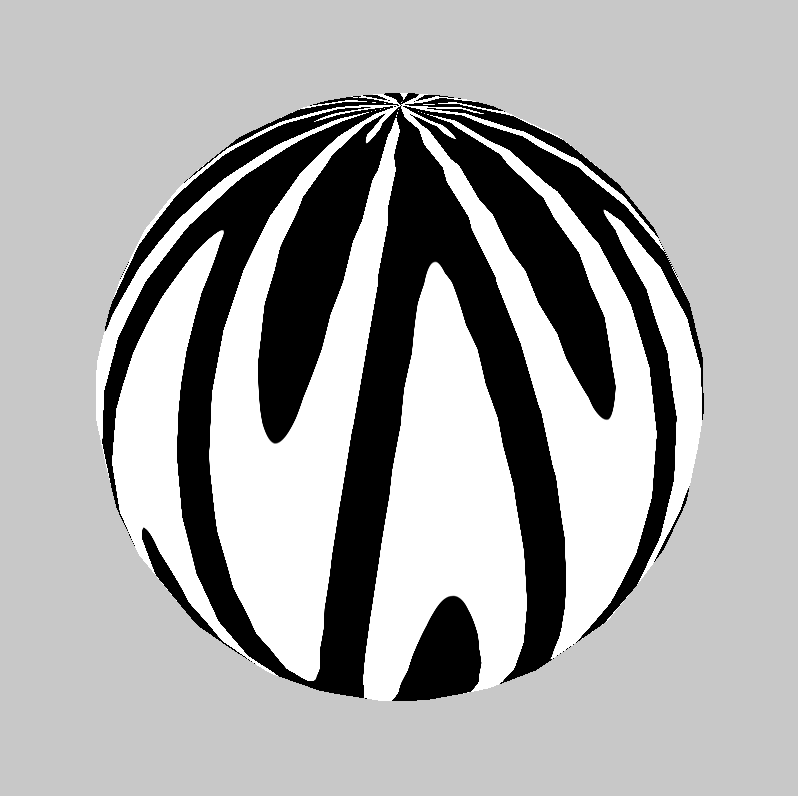
A sphere with zebra stripes
Maybe you want to use the normal lighting system but wiggle the vertices of your 3D model over time:
const myShader = baseMaterialShader().modify(() => {
  const t = uniformFloat(() => millis())
  getWorldInputs((inputs) => {
    inputs.position.x += 20 * sin(inputs.position.y * 0.05 + t * 0.004)
    return inputs
  })
})
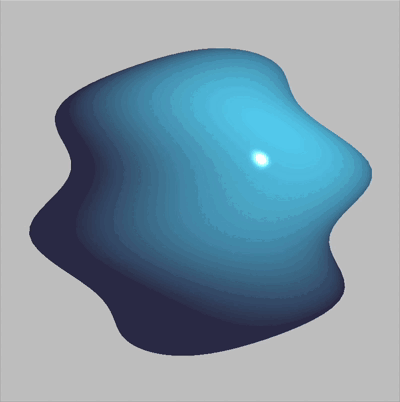
A wiggly sphere
You can do that to a line shader too!
const myStrokeShader = baseStrokeShader().modify(() => {
  const t = uniformFloat(() => millis())
  getWorldInputs((inputs) => {
    inputs.position.x += 20 * sin(inputs.position.y * 0.05 + t * 0.004)
    return inputs
  })
})
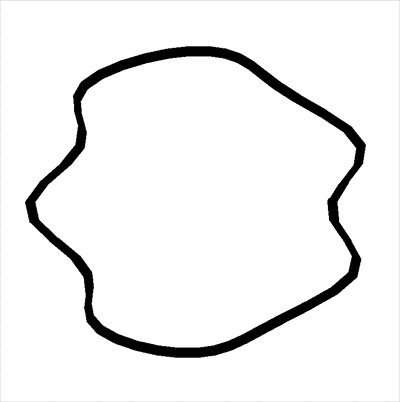
A wiggly outline of a circle
And, of course, what you're writing looks much more similar to what you'd write for the rest of p5. It's just JavaScript!
Design goals
I've been advocating for around two years now for some way to make shaders more accessible to newcomers. When I was at Figma in 2018, Rasmus Andersson described how Figma's learning curve should ideally be like a staircase. As summarized by Dylan Field: "First step should be easy to take, and further steps should lead you to build mastery over time." Learning shaders does not give you accessible steps to mastery; it presents you with a bunch of new things to grasp all at once:
- You have to learn a new programming language
- You have to learn a new graphics pipeline (vertex shaders, fragment shaders, what happens in each, and how data goes between them)
- You have to learn how data is sent from your CPU-based code to your shader
- On that note, you have to learn what a GPU is
I don't think it's possible or desirable to fully remove these concepts entirely. Instead, like Rasmus described, I want to make it so that you can learn one thing at a time, as it becomes relevant. In the context of p5.js, that means starting from as close to regular p5.js JavaScript code as possible.
For me, this means:
- You can write shaders with JavaScript
- The experience of writing (and debugging) your JavaScript should be as similar as possible to regular p5.js
- You should be able to start from a batteries-included starting point
- Not everything has to be supported, but you should be able to step up into full GLSL if you want full control
Inspiration
Started in 2021, I've been maintaining a library to generate 3D warp shaders. It's not the same UX that I'd like from a p5 shader builder, but it has a few similar features. Notably, you write a single part of a shader (a function that takes in a point in space, and returns a modified one) via JavaScript functions, which build up a graph of math operations, and can then output GLSL source code. This was where the initial seed of my interest came from.
From there, I've been looking at lots of projects and talking to lots of other people, all of which have provided inspiration for the approach we've gone with. In the order that I encountered them, here are a few:
- Shader Park by Torin Blankensmith and Peter Whidden has you write JavaScript, and then converts that to a GLSL signed distance function that is then raymarched to create 3D shapes. While p5.js aims to fit into the traditional mesh-based graphics pipeline primarily, writing JS with a simple p5-like API is a great experience.
- Shader Frog by Andy Ray takes a node-based approach rather than a programming based approach, constructing shaders by connecting small nodes of functionality together into a graph. The flexibility of editing just a small part of a complete whole is a feature we wanted p5 to be able to have. However, since p5 is a code library that does not enforce a specific editing experience, we wouldn't have a GUI for node construction, and some early prototypes I built in this style proved a bit too verbose to achieve the desired effect.
- The Luma Gaussian Splat API allows custom code in its WebGL renderer by having "shader hooks": little functions that you can write GLSL snippets for, like getting the position of a splat, or getting its final colour. This was a big idea for me: without needing a full shader graph, you could still make custom shaders by writing just a single GLSL function. I merged code into p5.js last summer that added a similar hooks system, with some updated (not requiring the user to know the difference between a vertex and a fragment shader hook, and having auto-updating uniforms if you pass in a function.) The next logical step, which Stalgia Grigg encouraged after reviewing the feature, was to take this a step further and allow the hooks to be written in regular JavaScript rather than a big string of GLSL.
- Three.js, lead by Ricardo Cabello, includes a JavaScript-based shader writing API called TSL. This exposes just about anything you can do in GLSL (or WSL, since a design goal was to be able to write once, run on multiple backends) by providing functions that map to GLSL constructs, building up a syntax tree that can then be converted to GLSL. This optimizes for flexibility and authors who are already at least passingly familiar with GLSL, as JavaScript itself makes it hard to write certain constructs just using functions, such as the + operator. We wanted something very similar to this, but ideally without having to re-teach people how to add numbers.
- Paper.js by Jürg Lehni and Jonathan Puckey allows you to use the + operator between vectors, something seemingly impossible in JavaScript since operator overloading is not a feature of the language. It is implemented by transpiling script tags with type="text/paperscript", rewriting vecA + vecB into something resembling vecA.add(vecB) but leaving the rest as-is. While we wanted to avoid parsing the whole sketch this way, which has the potential to make debugging the rest of your sketch more confusing, this approach to operator overloading seemed ideal for our uses. We wouldn't need to completely rewrite all the user's code; instead, a transpiler could make just minor changes, and then rely on regular JavaScript the rest of the way.
How it works
After I made an initial version of shader hooks that had you write little strings of GLSL, Luke Plowden took the torch and wrote p5.strands. He has done a great job completing the API! Let's take a look at what it does for you. When you write code like this:
baseMaterialShader().modify(() => {
  const t = uniformFloat(() => millis())
  getWorldInputs((inputs) => {
    inputs.position += 20 * sin(inputs.position.y * 0.05 + t * 0.004)
    return inputs
  })
})
...it first takes the contents of your modify() callback function and runs it through a JavaScript parser. This lets us target specific parts of the syntax tree and rewrite them. Here's what it looks like afterwards:
baseMaterialShader().modify(() => {
  const t = uniformFloat('t', () => millis())
  getWorldInputs((inputs) => {
    inputs.position = inputs.position.add(dynamicNode(20).mult(sin(inputs.position.y.mult(0.05).add(dynamicNode(t).mult(0.004)))))
    return inputs
  })
})
It's kept the overall structure, but it has done a few things for you:
- It has copied the name of your uniform variable and passed it in as the first parameter as a string. This lets us know that it should be called t in the GLSL code too, without you having to manually duplicate the name of your JavaScript variable into a parameter.
- It has transformed inputs.position += ... into inputs.position = inputs.position.add(...). JavaScript doesn't actually have operator overloading to let you use += on vectors, so we rewrite it for you into a function call.
- It wraps numbers like 20 into dynamicNode(20), which has functions like mult on it. Again, JavaScript doesn't know how to multiply a number and a vector, so we automatically wrap it in a class for you that does know.
Then we run the code! A subtle difference from normal JavaScript is that every function call and math operation no longer does any calculation immediately. Instead, it returns a new node that tracks all the operations that have happened to it. Then, at the end, it can look at the result that it has built up, and combine it into GLSL. For the above, it looks like this:
vec3 temp_0 = inputs.position + (20.0000 * sin((inputs.position.y * 0.0500) + (t * 0.0040)));
inputs.position = temp_0;
return inputs;
Here, it has done some more things for you:
- Types are automatically added to everything, like vec3! This is GLSL, which is a lot like C in that you have to declare the types of all your variables.
- Numbers have decimals! In GLSL, ints and floats are different things. If we want the result to be a float, we have to indicate to the compiler that it's not an int by specifying decimals, even when they're 0. p5.strands takes care of all this for you.
From there, your GLSL code is spliced into the default p5.js shader, where it mostly does everything it was doing before (positioning, lighting, materials, etc) but now additionally does the extra bit you asked it to do. You can override as much or as little behaviour as you want!
What you can make with it
I'm most excited about how people who know p5.js now have within reach a set of textures that were previously unavailable to them. Here's a little preview of a sketch that you work towards in a tutorial Luke has written:
We've got three types of shaders going on here:
- A material shader on the inner sphere making a gradient along the edges
- A positioning shader that places all of the little shapes. This is done via WebGL instancing: you just draw the shape once, and the shader places it many, many times.
- A filter shader applying the bloom effect
This looks quite different than most other examples in p5.js tutorials. I'm really excited to see what other things people make!